Tuesday, June 16, 2015

Noodle-Head Caravan Tote


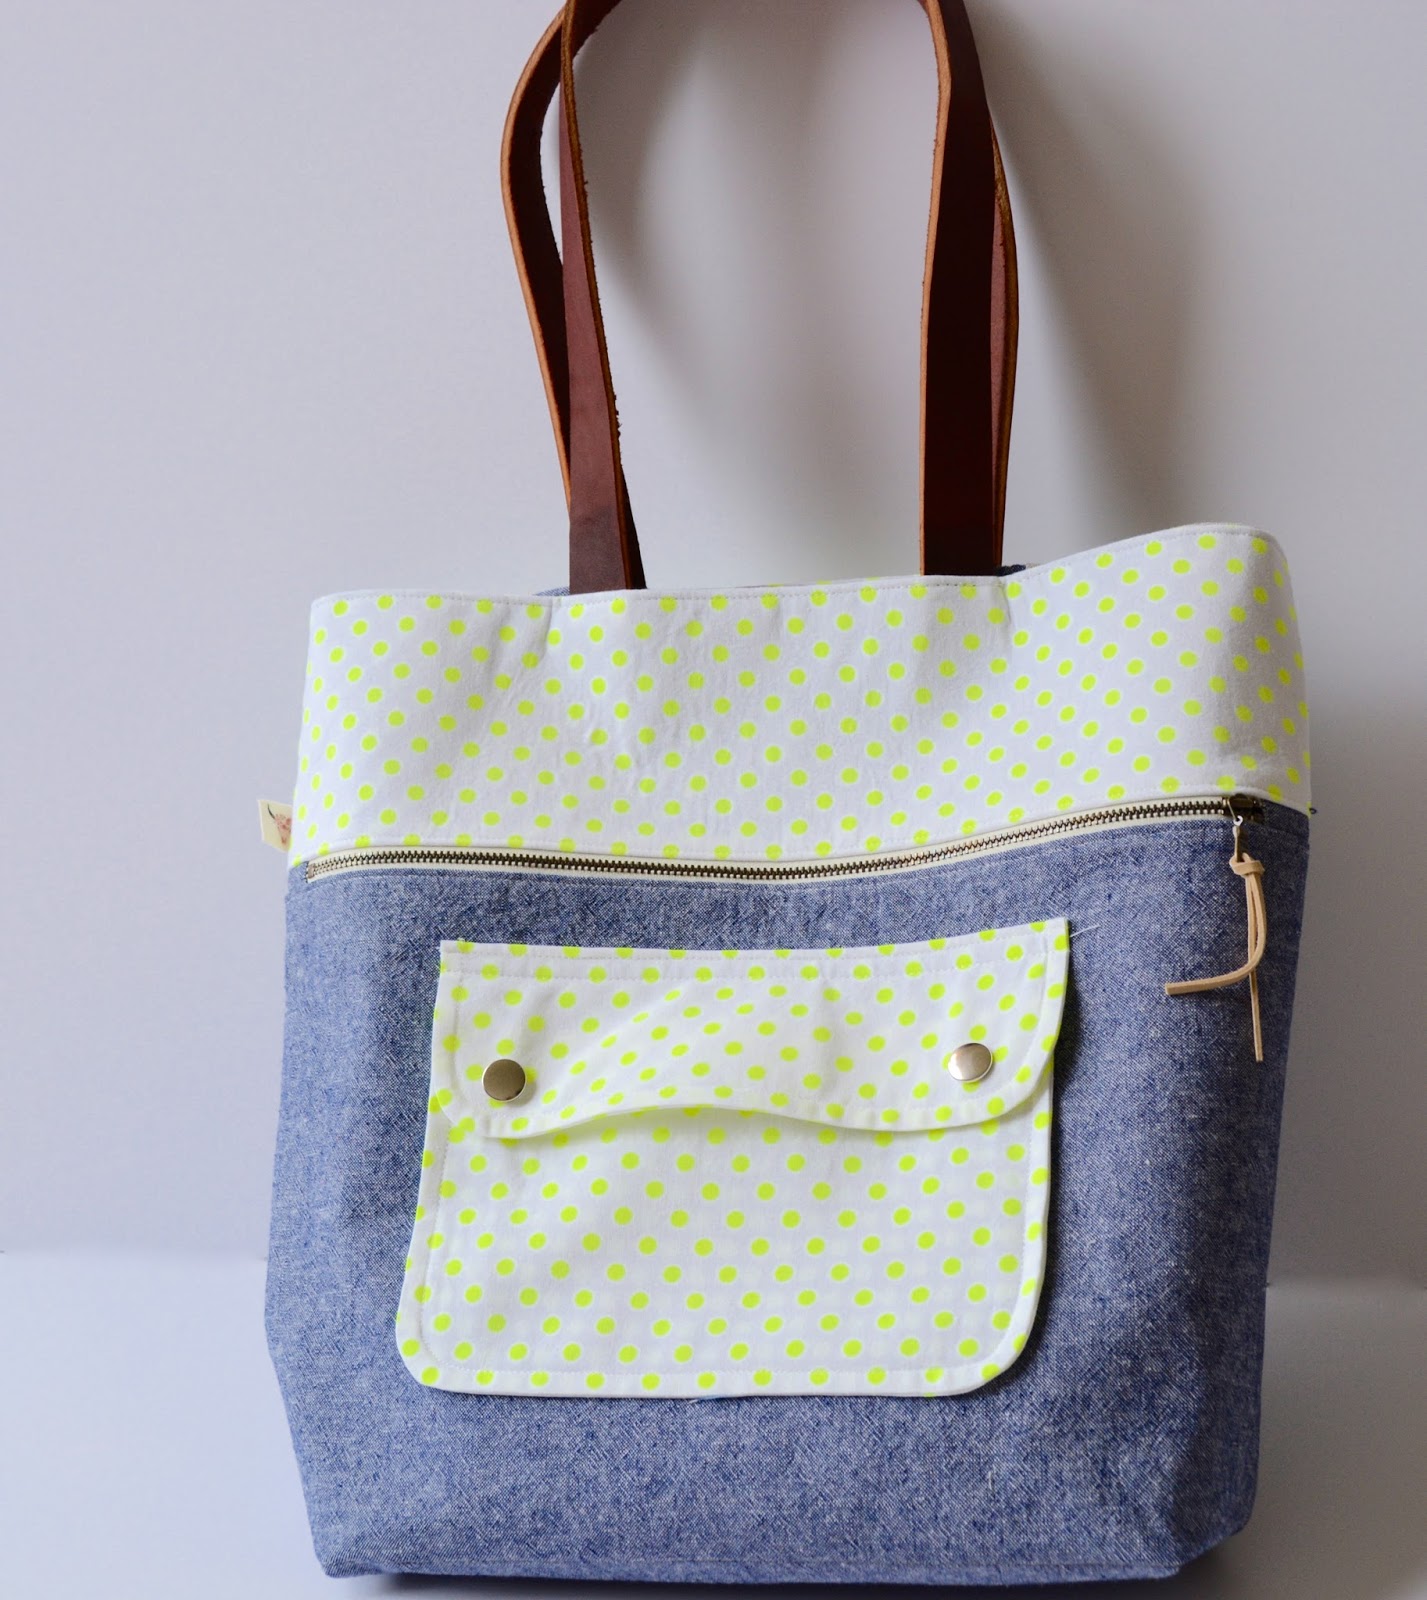
 A couple of years ago I bought a quilted Vera Bradley bag on sale to tote all of my nursing equipment and information around.  It was a great bag with lots of pockets and compartments to store all of my stuff...notebooks, binders, scissors, stethoscope, hemostats...and so on.  I do love the bag but there are 2 issues: 1.) I think there are actually TOO many pockets...I can never find anything and 2.) I spilled a massive cup of coffee on it a few days ago.

Fail and fail.

Well, it was actually a good time for fail number 2 because it forced me to create something new and it was perfect timing because I finally received all of the equipment to make Anna Graham's Caravan Tote.  You can find her amazing blog and patterns here.  Now I know I already raved on about her in my last post when I was showing you her Caravan Pouch, which was the free pattern that came along with this Caravan Tote pattern, but I'm going to go ahead and rave about her again.

This pattern was like a dream to follow.  Everything was so simple and well-explained, and most importantly, I love love love the finished product.  I'm pretty sure this is my favorite thing I've sewn to date.  It just looks so freaking cool, I can't stand it.


I'm loving this bag because there are enough pockets to hold all of my stuff including the multitudes of alcohol swabs that I leave the hospital with in my pockets, and those little blue caps to cap off IV tubing that end up going through the wash and find themselves in the lint trap of our dryer.  Not to mention my notebooks, binders, scissors, etc. (see list above) all have compartments in this lovely lovely tote.  However, there are not SO many pockets that I can't remember where I put things, so they end up all mixed up together in ALL of the pockets.  Anybody have that problem, or am I just a complete train wreck?


Regardless, my problems are now all solved, thanks to Anna Graham and her amazing pattern-creating skills.  Thank you Anna Graham.

Xoxo,
A


Wednesday, June 10, 2015

Noodlehead Caravan Pouch

So I have 3 days off in a row this week and all I want to do is sew sew sew.  I mean, it's summertime, the weather is beautiful and I should be outside but I just don't want to.  It would be nice if I could bring my machine outside, which I guess in theory I could but then I'd take my contained sewing mess and transfer it outside and then I'd probably fight with my husband about it...so I'll just keep it inside and feel slightly guilty about it.


Lately, I've been into sewing accessories.  Pouches, bags, lunch boxes, camera straps, wristlets...I seem to go in cycles.  There are times that all I want to do is quilt.  So I'll do that for a while and finish (or start) a bunch of projects and then all of a sudden all I'll want to do is makes garments.  So I'll do that for a while until I'll just feel like sewing something else.  Eventually, I'll come back to quilts, or garments, or whatever the prior obsession was and the cycle will start all over again.  Does that ever happen to any of you?


So anyway, yesterday I made this Caravan Pouch created by Anna over at Noodlehead.  I love her patterns so much.  They are always so precise and beautifully photographed and easy to follow.  The finished products are gorgeous.  Now this pouch is actually a free addition to her Caravan Tote created as a tote for knitting or crochet materials.  Now I tried my hand at knitting and I didn't stick with it for very long, so I plan on using it for lugging all of my nursing supplies to and from the hospital.


I don't yet have all the supplies in hand to make the tote but I was itching to try this pattern, so I just made the pouch so far.  Needless to say, I adore it.  I added a removable strap because I tend to carry things around my wrist or else I lose them.  It's good to know one's faults eh?

Xoxo,
A

Wednesday, June 3, 2015

Playground Quilt - A Long Work in Progress


So this little gem has been sitting in my WIP pile for a few months now and I finally broke it out again this week.  I almost have all of the blocks complete, but with trying to add things to the store and our recent move and any other excuse in the book that I can think of, this little lovely has been sitting lonely in my chest for a while. 


I started it as soon as Bonnie and Camille's latest line, Daysail, came out.  I love this line so much.  The colors and textures are a perfect depiction of a day out on the water.  The colors come together and can feel masculine or feminine...the perfect gender-neutral palette.  I made my blocks using a layer cake and it works perfectly to cut into the 4.5" and slightly larger squares.


 The pattern comes from Camille Roskelley's book Simply Retro.  I guess it would be an understatement to say I am obsessed with this book.  The pictures and colors are beautiful and there is not a quilt in it that I would not be willing to make.  Her instructions are clear and precise and her added tips are perfect for the novice or experienced quilter.  This may sounds like a sponsored post but I assure you it's not...I don't really have any readers so it wouldn't really benefit them to sponsor me, ha.


 Camille calls this pattern Playground.  She created it for her boys and reminisces about their younger years on the playground.  To me, it reminds me of those orange life rings...which is ultimately what made me decide to use the Daysail line for this quilt.

Hopefully there will be more to come with a finished quilt soon.  Until then...

Xoxo,
A

Wednesday, May 27, 2015

The miraculous key FOB Tutorial


So, I know there are a million other key FOB tutorials out there waiting to be seen, but since I actually had my camera out and ready to take pictures as I was creating today, I figured I might as well do another one while I am ready and willing.

I see people carrying around these key FOBs all the time and I decided it's about time I make one for myself.  Since they were so easy to make, I created a bunch more and will post them on the my Etsy Shop, in case you are feeling lazy and would rather just buy one.  I am also doing a special promotion for my blog readers.  If you order something from the shop, type in coupon code SEWBLOG to receive a $1.00 discount on any item of your choosing.

Now enough promoting of the shop and onto the tutorial.

Supplies:
Nylon Webbing (I used 1.25" webbing) (10" piece - this can be variable if you want a smaller/larger band)
Ribbon (My ribbon was 1" in width and worked well with the 1.25" webbing (10" or same size as your webbing)
Sewing Machine
Thread
Basting Spray (Any brand will do) or Double sided hem tape
Key FOB hardware - make sure it is the same width of your nylon webbing - I get mine here.
Pliers
Duck tape or regular tape or cloth or anything soft to wrap around pliers

1. Cut your nylon webbing and ribbon to be the same length (or somewhere close)


2. If you are using hem tape, cut your hem tape to the same length as the webbing, lay on top of webbing, and then layer ribbon on top.  Press with dry iron.   If you are using basting spray (I prefer this method), spray baste on back of the ribbon and then press ribbon onto nylon webbing.  Do not spray baste nylon webbing or the sides of your key FOB are going to be sticky...gross.


3.  Edge stitch down the sides of ribbon on the webbing, pivot at corners.  Don't forget to back stitch at the start and finish.  I used my Bernina patchwork foot and aligned my ribbon just inside the foot edge and it worked like a charm.


4. Trim edges of webbing if they are frayed.

5. Fold webbing in half and insert evenly into key fob hardware.

6.  Wrap your pliers in whatever material you choose (I ghettoed it up with a strip of fabric), place the pliers in the CENTER of the key fob and give it a nice squeeze.


Here is what happens if you try to do the sides first...you get a distorted key fob.  I guess this one will be mine. Ha. 


7.  Now squeeze each side. Make sure you clamp down hard so those little prongs dig into the webbing, otherwise your key FOB will come apart.  I did that too.


8.  Attach the included key ring and you are done!


9.  Admire your work and take many pictures.  Share them with me too! I would love to see what you created!


Tuesday, May 26, 2015

City Gym Shorts from The Purl Bee


I don't know about you, but we had a HOT Memorial Day here in Lancaster, PA.  I think it reached 90 degrees yesterday, a far cry from the 60's we've been sitting at for the rest of the week.  Personally, I prefer the 60's.

Anyway, I whipped up a pair of these City Gym Shorts from The Purl Bee and thoroughly enjoyed getting some use out of them yesterday.  I do love these shorts so much.  I love the retro look that that binding and the that 'V' slit thing on the side gives.  I used Robert Kaufman's Essex Dyed Linen in Flax for the back and binding.  For the front accent material I used an old line of Fig Tree & Co called California Girl.  I think that was my favorite line of theirs so far and it has long since been discontinued.  I was lucky enough to find a little bit at a local quilt shop on sale, so I stocked up big time.  I don't fabric hoard though, ahem.


I haven't done too much garment making since I've been sewing, and I have to say, these are a great beginner project.  The instructions were clear and easy to follow.  They also have a great tutorial on making your own bias binding, you can find it here.  I couldn't find my bias tape maker so after cutting the strips and sewing them together, I just folded it in half and ironed, and then folded each raw edge into the center crease and pressed again.  It worked like a charm.  I do have to say, I'm impressed my bias tape on these shorts, but I will attribute that to The Purl Bee's wonderful tutorial and instructions.


I'm going to apologize for my poor picture quality.  We were stuck using my iPhone as my camera battery died before we were able to get any pictures.  It's always something.  At some point, I'll post some good photos of things that I make on here.

Also, I'm VERY awkward when getting my photo taken...definitely not meant to be a model.  As I was going through the photos, most of them my face looked extremely pained, it's making me laugh very hard right now, but what fun would life be if were were all perfect eh?

Xoxo,
A